My SOLIDWORKS Transparent Part will not revert back to Shaded?
Article byMehdi Rezaei, CSWEupdated July 31, 2017
Article
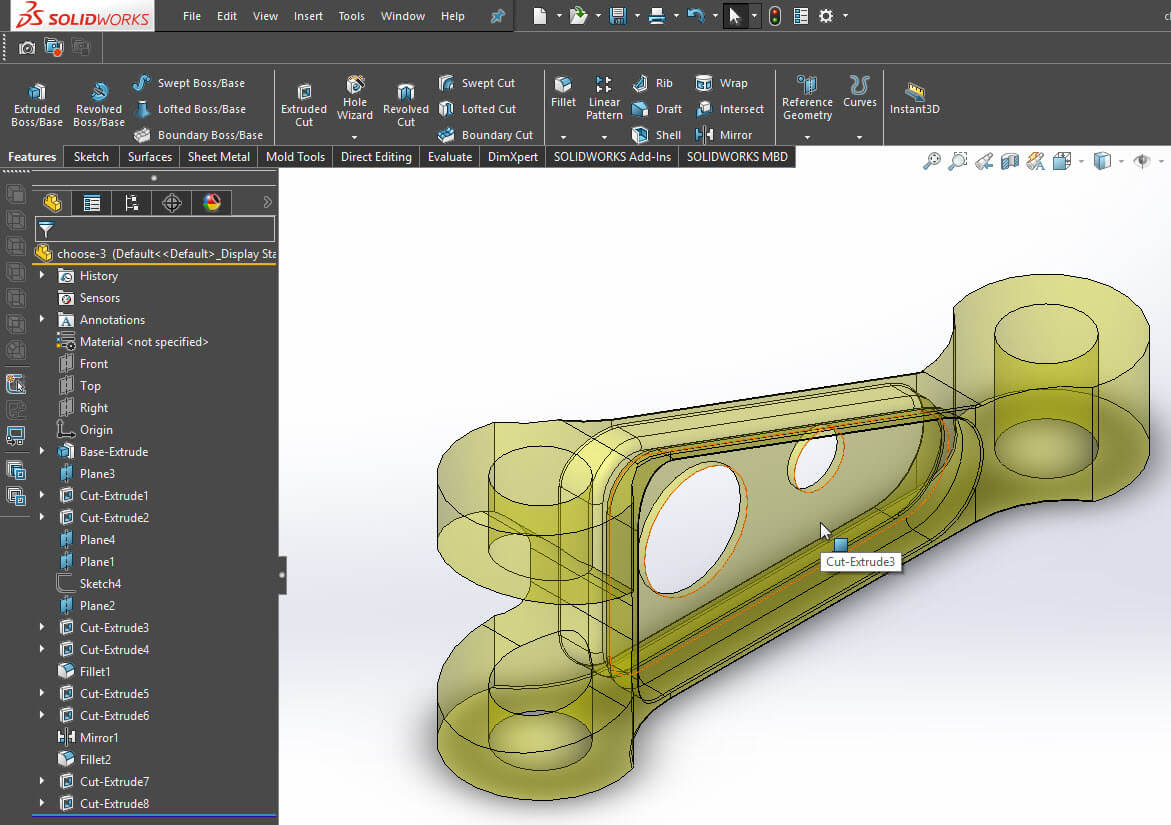
You have a SOLIDWORKS transparent part, but can’t convert it back to shaded? In this blog article we will review how to apply and edit transparency in a SOLIDWORKS model. The following image shows a part model which is set to transparent. Now we need to see how to modify the transparency of the 3D model in SOLIDWORKS.

Transparent Part Model
The following screenshot demonstrates that the display panel could be expanded to get access to transparency, color, hide and show control in SOLIDWORKS. In this panel, the transparency section can be clicked at the top of the feature tree to convert the part model to transparent. However in this case, you can see that the option was not selected while the model is transparent.

Display Panel to Control the Transparency, Colors and Hide/Show
Instead, you can right-click on the colour region as shown in the following image and select appearance. This feature is usually used to assign or edit the colour of a part model or any of the features under it. However, under its options the transparency amount can be adjusted as well.

Edit Appearance
As shown in the following image, under the Illustration tab, there is “Transparent Amount” with a slider. The slider goes from zero to one. Zero meaning no transparency/opaque and 1 means 100% transparent. By moving the slider the transparency amount can be adjusted. However, it seems that although the slider is at 0%, the part is transparent. There has to be another way to change the transparency of a model.

Change Transparency Amount under Appearance
我们讨论了,你可以编辑t的外观he part model or each feature under it. But those who know multi-body design technique have noticed that you can have more than one solid body in a part model. Usually, when you have two or more solid bodies in a part model, the Solid Bodies folder shows up in the feature tree. However, you can set the solid bodies folder to show up always no matter how many bodies you have. This is done through Tools > Options.
As shown in the following screenshot, under FeatureManager, the Solid Bodies can be found. This option is set to Automatic meaning that it is hidden when there is only one solid body and shows up when there is two or more. We can change this default setting and show the Solid Bodies folder at all time.

Show Solid Body Folder at All Time
Now if we go back to the transparent model in question, we can see in the display panel, in front of the solid body, the transparency region has lighted up. Removing the eye symbol, converts the model to shaded. That was the reason why the model showed transparent, but we could not see where it is to bring it back to shaded.

Change Transparency for Solid Bodies
Related Links
Get Certified SOLIDWORKS Services from Javelin
Javelin Experts can help you to:
