Strategies for increasing the throughput of your 3D printing operation

Article byJoseph Yangupdated April 14, 2020
Article
When many additive manufacturing (AM) users talk about the performance of a 3D printer, they often compare the maximum mechanical ‘speed’ of the printer itself, which is often measured by the length of toolpath it can extrude for a given time. While it is one of many metrics of estimating the performance, the mechanical speed is only a small portion of evaluating the overall throughput of additive manufacturing
Criteria for increasing throughput of your 3D printer:
Mechanical speed
Most AM users are already familiar with this figure. It is often measured in mm/s unit, representing the maximum linear equivalent length of the toolpath the printer can put down every second. However, the users must be careful when looking at this value. The maximum linear speed does not always equate to the volume the printer can build. These numbers can easily be manipulated by the use of thinner slice height and reducing the toolpath width to simply speed up the head movement.
The goal of 3D printing is to build the volume to create an object rather than drawing a picture. Instead of measuring in linear head speed, measuring the maximum volumetric extrusion speed is the better way to gauge the true speed of the printer.
话虽如此,一个非常重要的因素ost 3D printer manufacturers often hide is the effectiveness of such claims in maximum speed. Especially in FDM / FFF based technologies, without a properly temperature-stabilized build envelope simply ramping up the printing speed alone will not yield good results for any sizable build in materials such as ABS, PC, Nylon, Ultem and many other high performance engineering grade materials. This is one of the major reasons whyStratasys FDM printerslead the commercial additive manufacturing world – the temperature stabilized printing environment at 80-90% of the glass transition temperature of each material creates an ideal printing condition at maximum printing speed.
Model – to – support switch over time and frequency (applies to dual extruder printers)
Having the second extruder to print in either break-away or soluble support is a great measure to really open up the new possibilities in design. However, the time it takes for a dual-extrusion 3D printer to switch between the model and the support extruders for every layer becomes a burden in the overall throughput of the printer.
A typical dual-extrusion printer will take anywhere between 5 – 12 seconds to switch from model tip to support tip, then another 5 – 12 seconds to switch back. If you run a print with 300 layers total in support structure, it can add up to 1-2 hours of wasted time in print. To mitigate this time loss, there are 4 ways you can look into:
- Back to the drawing board– The best way to 3D print a part is to have a design that is optimized for the 3D printing process. Just like any set of design rules applied to many traditional manufacturing processes, there are rules for DFAM (Design For Additive Manufacturing) as well. Utilizing self-supporting angle allows the printer to generate over-hanging or under-cutting geometries without having support structures. Turning sharp corners into a 45-degree chamfer is one of the common methods to do this. Horizontally extruded holes could be in a shape of rhombus or teardrop to achieve this as well.
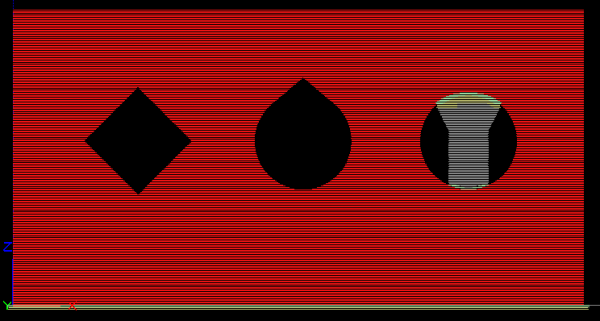
Example of eliminating the support structure. The rhombus or teardrop shapes can be later easily chased with a drill bit or a reamer.
- Using model material as support– For designs that must have support structures, this is a brilliant way to reduce the time loss in model-support swaps. The slicing software such as GrabCAD Print or Insight will replace the majority of the support structure layers to be printed in model material. However, the interfacing layers (where the support structure touches the model) will remain in support material for easy removal. In conjunction with this, adding perforation layers will make the removal of the support structure much easier.
- Tilt it– it is human nature to align objects squarely to references surrounding them. Though it may seem counter intuitive at first, tilting a part’s orientation can achieve great improvements in saving print time with reasonable compromise in surface finish and strength. However, when the part is tilted, it may require a stabilizing structure to prevent the part tipping over – result of reduced footprint after the tilt. In some applications, tilting the primary axis can improve load distribution of the part under stress, which is an added bonus.

-
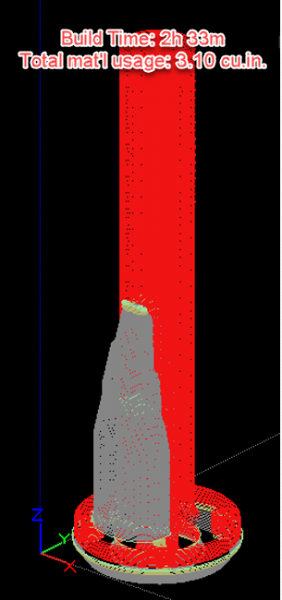
- 轴的例子默认设置和打印optimized by tilting with stabilize walls


- Packing parts– When a 3D printer prints multiple parts in a batch, it will only go through one model-support switching cycle per layer, regardless of the number of packed parts in the batch. For designs that cannot utilize self-supporting angle or use model material as support, this is a great way to reduce the time-cost per unit. They do not necessarily have to be the batches of identical parts, as long as the range of layers for support material usage overlap between the parts.
Printing time vs Post process time
If the part you’re looking to print has a lot of snap-tabs, posts or pegs branching along multi axes, it may be difficult to optimize the support structure. In such case, modularizing those small features into separate pieces and assembling them or bonding to the main body may be a better option than taking up the printer time. In addition to saving printing time, modularizing the small features gives the freedom to orient each sub-component in the ideal axis to increase strength or flexibility.
Reducing idle time of the printer
当安排打印作业时,建议break them down into 24-hour blocks during weekdays if possible. Although 3D printing has become much more reliable over the years, there is always a risk of malfunction that can ruin the batch. Due to the fact in 3D printing, even just one missing layer can render the entire batch useless. This could be due to a power blip, an undetected intermittent tip clog or mechanical/electrical failure of the printer itself. Keeping the 24-hour rule can reduce the risk exposure and you can always restart the batch the next day in case anything had gone wrong overnight.
Scheduling a job for a typical weekend (Friday – Monday), Stacking up parts vertically to fill the 60 – 70 hours void can be a great way to reduce the idle time of the printer. Though a 70-hour print job sounds risky, when parts are stacked up even if the print fails at the 60thhour only the parts at the top of the stack are affected while the rest of the stack is still salvageable.
Conclusion
The mechanical performance of a printer is only a small part of the big picture when it comes to increasing the overall throughput of the additive manufacturing process in your business. Understanding the limitations and creative solutions paired with the right software tool that compliments those solutions can further improve the efficiency of your additive manufacturing endeavor and greatly accelerate the return on investment.
Related Links
Want to get started with 3D Printing?
Our 3D Printing resources can help you to: